Every driver who has to drive to his work every morning is haunted with one terrible possibility. What could be more depressing for any driver than getting into his in the morning or on a rainy night, turning on the key, and getting shocked that nothing happened! In such bad case scenarios, a jump-start cable and a working car are your lucky card to get back to the road. Following are organized steps to follow with no panic if you, unfortunately, faced such problem.
Step One– Position and Check
Park the working and the broken car in a face to face position, but remember not to park them too close because the vehicles must not touch in any way. Before starting the jump-start process make sure that you are using a good set of jumper cables that feature thick wire and clean clamps. Being cautious is always a must when you deal with gas and electrical charges, hence, you should check that the cables are not swaying into either vehicles’ engine compartment where they might be caught on moving parts. Before moving to the next step, check that both vehicles are fully off; light, radio, flashers, etc., set the parking brakes, and depending on the transmission system in the vehicles; automatic or manual, make sure that they are in either “P”ark” or “N”eutral”.
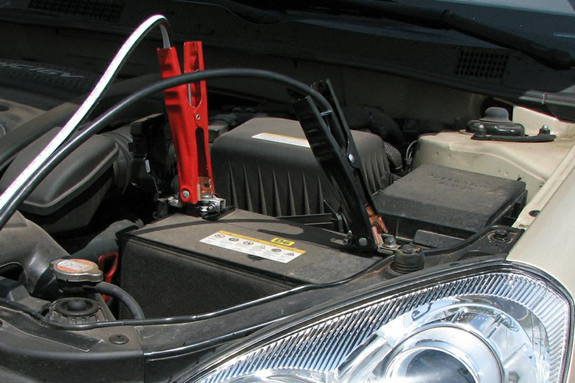
Step Two– Positive-Red
After the positioning and checking processes, clamp one of the positive (red) jumper cable ends to the positive battery terminal of the broken vehicle. Check and double check that the connection is strong with the clamp tightly clutching the battery terminal. Now, connect the other end of the positive (red) cable to the positive battery terminal on the “healthy” vehicle.
Step Three– Negative-Black
Connect one of the negative (black) cable ends to the negative battery terminal on the booster car. Finally, attach the other end of the negative cable to an bare metal surface on the engine of the dead car. Try to make this spot as far from the dead battery as possible. This will close the circuit and reduce the possibility of setting fire to any hydrogen gas. Finally, make a final check to assure that the cables are not near any moving parts in both vehicles.
Step Four– Double Check
Start the working car engine. Depending on the state of the dead battery, let the vehicles idle for several minutes. If the dead battery has drained because the lights were left for an extended period of time, it will most probably start immediately. On the other hand, if the battery is old or it did not work for a long time (it will probably take awhile to charge it efficiently.
Step Five– What If!
Since the main goal of this process is to save time and money, it is advisable that you don’t keep trying f the dead vehicle refuses to start, as this might damage the starter. Check if there are any additional problems; don’t continue trying to start the dead vehicle until the other problems are solved.
Step Six– It Worked!
Once the dead vehicle starts and is running smoothly, disconnect the cables in the reverse order that they were connected. Safety first! Never lose your attention to the dangling cables, as they might fall into the engine compartments or touch each other.
Step Seven– Do Not Want This Next Morning!
To properly charge the battery, attach it to a certified battery charger and leave it connected for at least 12 hours. The best choice will always be by taking your car to an automotive service shop for complete charging. In cases where the first two options are not handy, driving the car for an extended period would also charge the battery.
For more information about sell used cars, please visit